

Documentation
/ User's manual in C++
: 
| I.3. The Python Interface | ||
|---|---|---|
 | Chapter I. Overview: Uranie in a nutshell |  |
Accessing Uranie tools is also possible using the Python language.
The PyROOT tool allows to access to ROOT classes from a Python command line or script. Uranie can benefit from this tool as well. All the use-case macros provided in the previous version of this user manual (c.f. Chapter XIV) are now available in Python in the python version of this manual.
From Uranie version 4.9, only Python greater than 3.8 can be used due to the use of ROOT version v6.32 (Python 2 is deprecated). Two words of caution about this:
The macros provided in the python version of this manual have indeed been tested with Python 3 (upper than 3.8).
Note, historically, from Uranie version 4.5 to v4.8, both Python 2 and 3 were used at the same time if it is installed again a ROOT version from v6.20.00 to v6.28.06. In order to get this compatibility, it means that the printing format has to be homogenised and this implies that from Uranie version 4.2, these macros might not be working anymore for Python version below or equal to 2.6.
Today's operating systems usually embed both versions of python and many of these still use the version 2 as a reference (see the block above with both python versions). Given the fact that one can have as many different python versions as possible, it should be possible to specify which one is of interest for the ongoing installation. The following lines should be used to specify the python version to be used, providing that the "dev" packages are indeed installed for this version:
cmake ${PATH_TO_ROOT_SOURCES} -DPYTHON_EXECUTABLE=${PATH_TO_PYTHON_BIN} -DPYTHON_INCLUDE_DIR=${PATH_TO_PYTHON_INC} -DPYTHON_LIBRARY=${PATH_TO_PYTHON_LIB} ...These three specific python flags should be used both for ROOT and Uranie in a coherent way in order to install both platforms with a chosen Python's version. To get the recommended cmake line both for ROOT and Uranie see the README provided with the Uranie-sources.
In order to access ROOT and Uranie from Python, we need to ensure that some environment variables are properly set:
$PYTHONPATH must contain the $ROOTSYS/lib directory, where $ROOTSYS is ROOT's installation directory.
$LD_LIBRARY_PATH must contain the $ROOTSYS/lib directory.
When the environment variables for Uranie and PyROOT are properly set, we can access to the classes as follows:
# Load the ROOT module
import ROOT
# Create a new data server object
tds=ROOT.URANIE.DataServer.TDataServer("myTDS","DataServer for python example")
# Add an attribute to the data server
tds.addAttribute( ROOT.URANIE.DataServer.TNormalDistribution("x", 0.0, 1.0) )
# Create a sampler object
sampler = ROOT.URANIE.Sampler.TSampling(tds, "lhs", 1000)
# Generate data
sampler.generateSample()
# Display the histogram of attribute x
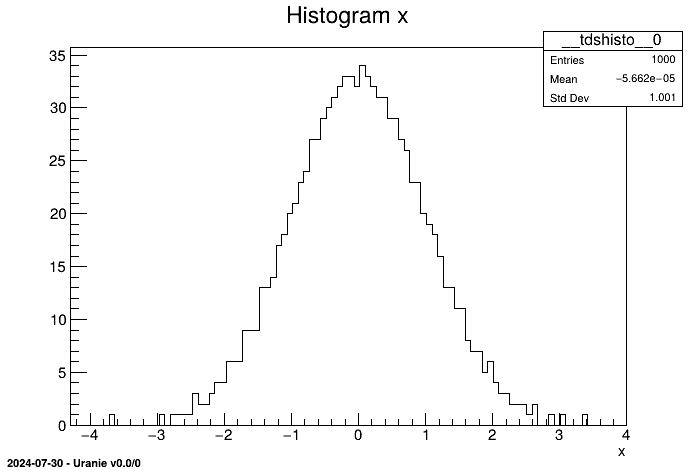
tds.draw("x")
This code should produce a graphic as the one displayed in Figure I.2.
The instructions above can be executed either through the Python command line, or be written in a file (myscript.py in the example below) and run using the command:
python -i myscript.pyThe -i option allows to stay in the Python environment at the end of the execution. This prevents the produced image to be automatically closed.
In the previous example, we can see that the access to Uranie's classes is somewhat tedious. In order to ease the process, a set of specific modules have been created. We call it the PyURANIE interface.
It is then possible to re-write the previous example using these specific modules:
# Load the URANIE module
from ROOT import URANIE

# Load the DataServer and Sampler modules
from URANIE import DataServer, Sampler

# Create a new data server object
tds = DataServer.TDataServer("myTDS","DataServer for the python example")

# Add an attribute to the data server
tds.addAttribute( DataServer.TNormalDistribution("x", 0.0, 1.0) )

# Create a sampler object
sampler = Sampler.TSampling(tds, "lhs", 1000)

# Generate data
sampler.generateSample()

# Display the histogram of attribute x
tds.draw("x")
The access to ROOT classes is provided through the ROOT module.
The PyURANIE interface also allows to use the command:
from URANIE.DataServer import *This command loads all the classes of the DataServer module in Python and makes them directly accessible. It is similar to the C++ command using namespace URANIE::DataServer. However, in Python, using this command is not recommended. It can create name conflicts and use a large amount of memory.
Finally the equivalent of the rootlogon.C has been written for python, and is called
rootlogon.py. It is composed of two parts, as for the one in C++, the second one being the exact
equivalent. The first one, on the other hand, is a bit different and this difference arises from the way the language
are dealing with loading modules. By doing
from rootlogon import DataServer
one can, for instance, directly creates a TDataServer by doing
toto=DataServer.TDataServer()The example of rootlogon file for python is the following:
import ROOT

# Create shortcuts if uranie exists
urasys = ROOT.TString(ROOT.gSystem.Getenv("URANIESYS"))
if not urasys.EqualTo(""):
    from ROOT.URANIE import DataServer as DataServer
    from ROOT.URANIE import Sampler as Sampler
    from ROOT.URANIE import Launcher as Launcher
    from ROOT.URANIE import Relauncher as Relauncher
    from ROOT.URANIE import Reoptimizer as Reoptimizer
    from ROOT.URANIE import Sensitivity as Sensitivity
    from ROOT.URANIE import Optimizer as Optimizer
    from ROOT.URANIE import Modeler as Modeler
    from ROOT.URANIE import Calibration as Calibration
    from ROOT.URANIE import UncertModeler as UncertModeler
    from ROOT.URANIE import Reliability as Reliability
    from ROOT.URANIE import XMLProblem as XMLProblem
    from ROOT.URANIE import MpiRelauncher as MpiRelauncher
    pass

# General graphical style
white = 0

# PlotStyle
ROOT.gStyle.SetPalette(1)
ROOT.gStyle.SetOptDate(21)

# Legend
ROOT.gStyle.SetLegendBorderSize(0)
ROOT.gStyle.SetFillStyle(0)

# Pads
ROOT.gStyle.SetPadColor(white)
ROOT.gStyle.SetTitleFillColor(white)
ROOT.gStyle.SetStatColor(white)

#  ====================  Hint ====================
#
#    Might be practical to store this in a convenient place (for instance
#    the ".python" folder in your home directory) or any other place where
#    your $PYTHONPATH is pointing.
#
#    example : export PYTHONPATH=$PYTHONPATH:${HOME}/.mypython/
#
#    It should then be called as "from rootlogon import " + the list of module
#    This would replace the shortcuts created and import done in the rest of
#    the scripts
#
#    Many style issue can be set once and for all here.
#    toto=DataServer.TDataServer()
#
The PyROOT environment has a few specificities which it is preferable to be aware of (the rest being discussed already in Section I.2.6). The following websites help to learn about them:
Presentation on the PyROOT website: http://root.cern.ch/drupal/content/pyroot
The PyROOT Manual: http://wlav.web.cern.ch/wlav/pyroot/index.html
The ROOT users forum: http://root.cern.ch/phpBB3/index.php
Finally, reference [PyUranie] introduces (in French) some of these problems and shows examples on how to use Uranie with PyROOT.
| |  | |
| I.2. ROOT Environment |  | Chapter II. The DataServer module |